 First I figured it would be a good idea to find out what I might be
letting myself in for, so I ordered a set of plans and instructions,
and read them carefully. Having convinced myself that I wasn't going
to need any tools I didn't already have, and that there wasn't any
complicated carpentry I wouldn't be able to do, I placed an order,
and went away on holiday.
First I figured it would be a good idea to find out what I might be
letting myself in for, so I ordered a set of plans and instructions,
and read them carefully. Having convinced myself that I wasn't going
to need any tools I didn't already have, and that there wasn't any
complicated carpentry I wouldn't be able to do, I placed an order,
and went away on holiday.
A few days after I came back from holiday a large parcel was delivered. I took it to the workshop, un-packed it, and spread all the bits out so that I could see what I'd got. Then I put the strings, pins and levers away, and considered the wood. The neck was cut to shape and had the requisite holes already drilled in it. The other wooden parts were roughly cut to shape.
The first step was to get the front and back edges of the sound-box sides straight so that the sound-board and back would fit properly. I found I needed a long straight edge to do this properly. I also needed to make sure my plane was as sharp as I could get it, as the grain in the wood was a little unforgiving.
The next was to fix the top and base pieces to the sides. The top and base pieces had already had their edges angled correctly, so I only had to mark up the sides and stick them together in the right places. The next lesson I learned is that you can never have too many clamps. Broad self-adhesive parcel tape will do at a pinch provided you've got something to stop the joints sliding.
Now the neck had to be fitted (temporarily) to the top of the sound box so that other pieces (in particular the pillar) could be measured. Getting this fit right was trickier than it first looked because the neck lies to one side of the centre line but the base of the pillar needs to lie on the centre line. I didn't get this quite right at this stage, and had to make adjustments later.
The tenon and mortise joint between neck and pillar had to be cut next. This was the bit I thought would be most difficult, so I took my time over it, with lots of trial fittings and so on.
 At this point the instructions called for a piece of waste wood the
same thickness as the sound-board, but I didn't (yet) have any, so
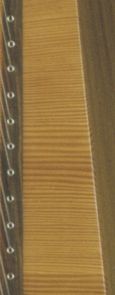
I turned my attention to the sound-board. It is spruce, and the grain
has to run across the sound-box from side to side, so it is made from
a number of short pieces glued edge to edge. Getting the edges planed
so that the resultant board was flat was a little tricky. A tip the
kit supplier gave me was to always plane edges in pairs. It's also
important to make sure the grain runs in the same direction on all
the pieces. One or two of the joins needed more than one attempt
to get right. This was probably the most difficult bit in the whole
construction. The broad self-adhesive parcel tape was particularly
handy at this stage.
At this point the instructions called for a piece of waste wood the
same thickness as the sound-board, but I didn't (yet) have any, so
I turned my attention to the sound-board. It is spruce, and the grain
has to run across the sound-box from side to side, so it is made from
a number of short pieces glued edge to edge. Getting the edges planed
so that the resultant board was flat was a little tricky. A tip the
kit supplier gave me was to always plane edges in pairs. It's also
important to make sure the grain runs in the same direction on all
the pieces. One or two of the joins needed more than one attempt
to get right. This was probably the most difficult bit in the whole
construction. The broad self-adhesive parcel tape was particularly
handy at this stage.
 I now had the piece of waste wood I needed to finish joining the shoulder,
neck and pillar pieces together. Shaping the shoulder was quite
hard work. It would have been easier if I'd taken more care to get the
grain on all the pieces going in the same direction... About half the
work was in re-sharpening the spoke-shave blade at regular intervals.
The first serious bit of sand-papering came somewhere here too.
I now had the piece of waste wood I needed to finish joining the shoulder,
neck and pillar pieces together. Shaping the shoulder was quite
hard work. It would have been easier if I'd taken more care to get the
grain on all the pieces going in the same direction... About half the
work was in re-sharpening the spoke-shave blade at regular intervals.
The first serious bit of sand-papering came somewhere here too.
Then it was back to the sound-board. The design calls for this to be tapered in thickness. I considered how I could clamp it in order to plane it, and decided that it would have to be stuck to something as there was no way I could secure it to a work surface any other way. I decided which surface would be the back, and tidied it up. The choice was fairly easy, as it was the side I'd used for reference when sticking the pieces together. After shaping and tapering the internal half of the string-bar, I stuck it to the back of the sound-board, and then stuck the sound-board to the front of the sound-box. This join takes a lot of tension when the harp is strung, and I should have taken at least twice as much care getting it secure. I ended up having to re-glue a six-inch section that hadn't been glued and clamped quite well enough after the harp was strung, because it popped open under the tension.
Once the sound-board was attached to the sound-box I could secure the assembly well enough to enable me to plane the sound-board to its appropriate tapered thickness. The external side of the string-bar also had to be shaped and tapered, and then stuck on, and the string holes drilled.
At this stage, while the instrument was still in two main pieces, was a good point to do a fair bit of sanding. This was dusty work, and a lot less unpleasant if done outside. Luckily, the weather was fine.
The last tricky bit was fitting the two main parts together. Despite my best efforts to get the fit correct earlier, there were still some adjustments to be made... Once the instrument was in one piece the back of the sound-box could be fitted, and then the serious sanding and polishing began.
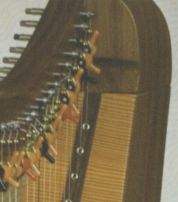
 With the polishing done, the moment of truth arrived. Stringing
the instrument was relatively easy because the holes for the tuning
and bridge pins had already been drilled. The semitone levers were
a bit trickier however, as their positioning is fairly critical,
and they don't have much scope for adjustment after they're fitted.
With the polishing done, the moment of truth arrived. Stringing
the instrument was relatively easy because the holes for the tuning
and bridge pins had already been drilled. The semitone levers were
a bit trickier however, as their positioning is fairly critical,
and they don't have much scope for adjustment after they're fitted.
I took the best part of a month to bring the harp up to pitch, but that did include the setback when part of the sound-board popped free of the sound-box because I'd not clamped it quite firmly enough while the glue was setting. It took a while to settle down even then, but it now stays pretty much in tune with itself, and doesn't need much adjustment to bring it back to pitch if it has drifted with the weather.
The main construction took me almost a month of evenings and week-ends. There were plenty of enforced breaks while glue or polish dried. I didn't note the actual hours I spent, and I didn't take any photos either. I now wish I had done the latter. You'd have had some pictures of work in progress to look at as well...
Around the time I was stringing my lap harp I noticed a problem with the shoulder of my clarsach. It seems I didn't quite manage to get the blocks it is composed of stuck together quite firmly enough, and one of the joins decided to split. Luckily this did not happen in a catastrophic manner, but I did have to slacken off all the strings and fight with the screw that held the offending block to the soundbox in order to fix the problem. I had to trim and re-fit the block, and this time I used some dowel to make sure the join would be more resistant to shear stresses. For a while I had two harps needing tuning at least daily, but the clarsach settled down again very quickly.
The clarsach was, however, not an instrument with much future. It's quite heavily strung, and unforgiving of less-than-perfect construction. Mine suffered a soundboard separation event while I was away on a work trip to Houston in July 2002. Repairing it would mean re-stringing it, so it hasn't been playable since then.